Saturday, 3 June 2023

I think it's called a double step card.

So here's the thing, I did try to google and find out what this fun fold was called. Do you know what happens when a crafter googles card folds? Down the rabbit hole I went.  Hours later, I found many opinions on what things were called.  So - here's a (no need to name) fun fold:


The christmas card was my original card with this fold (from a demo event last September), and the other 2 are the ones I showed in my What's Up Wednesday live - here's the link for the replay on my YouTube channel

Here are the cardstock measurements:


Score and burnish the base and strip.  Adhere the background piece and the piece on the front of the strip before adhering the strip to the base.


Once assembled, add the DSP strip (1/2" x 5  1/4") or cardstock to the front panel if the design calls for it. 


Add a stamped liner to the inside of the card (or just stamp the cardstock if it is light coloured) and stamp the envelope.


And finally, decorate the front of the card.  So many options.  I love these colours - they are bright and summery and happy.


This is an easy fun fold and gives extra dimension to your design.  I would love to see your version of this card.  Please post in the comments or on my Facebook page.   

Sets used:  Hey Chuck, On the Ocean, Cheerful Daisies and a retired set called Spruced Up.

Happy stamping everyone!
T

Tuesday, 9 May 2023

I know, I know - I said monkey ...

 ... but then I went down the daisy dies rabbit hole.

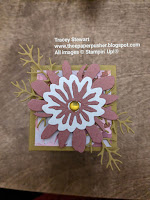
Remember when I said I needed to give the daisy dies a good play and see all I could make? Well, then I decided I needed a daisy for the top of a treat box I made. So, 4 hours later, and so many options.

And now that I have finished fighting with my blogspot login for the last 2 days - yay! victory goes to me - I can share the projects.

With new sets, I like to try all the dies and see what they can do. Figure out which ones only cut out stamped images, which ones work alone, and with some sets, which ones just emboss or cut holes. Here's what I came up with.  And let me say again - adhesive sheets are your best friend! If it's a small or thin die cut, or you think it's meant to layer, put adhesive sheets on the back.


Most of the dies work alone, but 7 of them also cut out stamped images (the stamped image of the stem is missing in this picture). The stamp set also has 4 sentiment stamps and a small flower center stamp - doesn't have a die but is easily fussy cut. With this bundle - the magic is in the layering of pieces. So I started trying different combinations.

Once I started I had ideas a plenty and just kept making combinations.  So here are an extra 9 cards.  I'll show the card first and then the dies I used.  If you need more info, refer to the card number and send me a message.

Card 1: I cut 2 stems and overlapped behind the leaves. The leaves are solid die cut in the lighter green with just the centers of the leaves on top (adhesive sheets!) in the darker green.

Card 2: Cut out three of the flower outlines and add colour to the center with a small blending brush. Add an Opaque Oval embellishment to each flower.

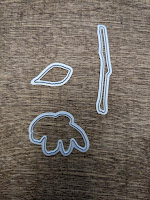
    

Card 3: Trim around the center of the top layer flower to show the center of the die cut below. 


Card 4: The leaves are a solid dark green overlayed with the outline in a lighter green.  The little fronds came from the center of the leaves part of the die.


Card 5:The center on the smaller full flower is hand cut with wavy edges. The leaves and sprigs come from bough punch.                


Card 6: The 2 dig dies together will give you the white outline and center piece. The detailed piece alone gives you the mauve layer to in lay in the white.  The leaves are a lighter colour center in laid into the darker green outline.


Card 7: The small flower center comes from cutting a scrap of yellow with the detailed die, for the bigger flower use the small stand alone die, flip it over and trim a little. For the side view daisy, I used a scrap with the detailed die and the outline die as well.


Card 8:  Stamped just the outline stamp and center piece then die cut. DSP strips are 3 1/4" x 7/8". The leaves are die cut with the centers left in.


Card 9:  A little burberry take on things.


And I did finally get to the box top. It was one of the last projects I finished. This box came from the Paper Pixie (as did card 8) and is easier to make than it looks.  Three detailed flower from the multi flower die make the base of the flower.


So, enough daisies for you? It really is fun to just start cutting without a plan and see what happens.

I will get to other cards - thank you in advance for your patience.  Right now though, I am off to prep for this weekends pop up. If you're in Morinville, or just want to take a drive, stop by and make a card or two.  I'll have some make and take stations set up, and all inclusive kits to sell.  Hope to see you.

Have a great week! Happy stamping - and die cutting!
T


Saturday, 4 June 2022

let's twist again ...

 ... like we did last fancy fold. Did I mention just about everything makes me think of a song? I like having a constant soundtrack playing in my head.

But let's talk the double twist pop up card.  I got this card idea from the amazing Tamara Bertram.  Here is the video I made of the how the card goes to together:


And the measurements for all the cutting and scoring. Start with a 7" x 7" piece of cardstock two 3 1/2" x 3 1/2" squares (these all come out of one sheet of cardstock:


The finished product will fold flat and be 7" x 3 1/2" so will require a homemade DSP envelope or can fit in the SU slimline envelopes.

Then you need layers:       

        colored cardstock                    2 - 3" x 3"   and 1 - 6 1/4" x 2 3/4"

        designer series paper              2 -  2 3/4" x 2 3/4"   and 1 - 6" x 2 1/2"


And finally, decorate as you wish. Just make sure that there is a popped up element that hold each folded panel in place when the card is open.  Use can you cardstock with dimensionals, die cuts on foam sheets, or embellishments.

These are big impact cards that come together pretty quick.  I would love to see the cards you make using this design.

Happy crafting.

T


Saturday, 21 May 2022

I'm sensing a theme

So for this week I picked the theme of Graduation for the Monday Challenge. Then I just ended up making grad stuff all week - even the Paper Pumpkin cards I made on Thursday could be used for grad - especially if one of the new in colours happens to be a school colour. Lots to show so here goes.

Here is the video from Show and Tell with Tracey were I made the two fun fold cards:

The Dutch Door fold card is what I was aiming for.  


Here is how the base is made.  Start with a piece of cardstock that is 8" x 7 1/8" and score first then cut out the side pieces (I used these to make some of the layers).


The bulk of the time on this card is cutting layers.  

    flap layers              coloured cardstock    3 3/4" x 2 1/8" 
                                  white cardstock          3 5/8" x 2" 

    door layers            coloured cardstock    1 3/4" x 2 1/8" 
    need 2 of each      white cardstock         1 5/8" x 2" 

    front decor *          coloured cardstock    2 3/4" x 2 3/4"   (this is the hat)
                                  white cardstock         2 3/4" x 2 3/4"

    inside layers         coloured cardstock    3 3/4" x 4 1/2" 
                                 white cardstock         3 5/8" x 4 3/8" 

*For the grad card, I left off the front most layer - this could be stamped, DSP, embossed, die cuts, sentiments ....  I just didn't need it as I wanted a mortarboard, at a jaunty angle.


I have chosen to do my cards in the colours of the 2 local high schools (Go Oilers Go !) but this card looks great with DSP and a rooster - and thanks to Dawn Griffith for the measurements.

I started looking for a Gate Fold card - that's what I thought the above card was called - it's not .  Along the way I found this little charmer by the Stamping Bunny:


Start with a piece of cardstock that is 8 1/2" x 3 7/8" and on the 8 1/2" side score in 2 1/8" in from each edge.  Cut a piece for the inside that is 4" x 3 5/8" - but don't adhere it yet!


The "gown pieces are a 3"x3" square of white cut in half diagonally (save the other half for a different card) and then cut that piece in half from the point to the center of the long side.  I used 2 pieces of navy (or whatever school colours) that are 1/4" x 3 1/2" for the stripes - just adhere them with the pieces hanging over the edge and trim at the angle along the card side.  

Once the front of the card is done, you can attach the hat.  You will need a piece about 1 1/2" x 3" that is scored in half on the long side.  This gets mounted at the top center of the card - before you add the white layer.  Make sure you keep the fold just above the edge of the card so the front pieces still close.  "Test before gluing" is always a good idea.  And now you can put in the white inside piece.


Close the "gates" and line up the hat to cover the gown pieces - bottom of hat should just cover the stripes. I reccommend using a strong adhesive to adhere the hat to the flap.  If you put  the hat higher up, it won't fit in a standard envelope.  Also, if you are going to attach a tassel with string, do that first so you tuck the ends in between the hat and attaching piece for a cleaner look.


And for a bonus, a couple extra projects that are pretty self explanatory:


Gift card holders and treat boxes.  I seem to make a version out of them for just about every occasion.  Never know when you want to give someone a little somethin' to make their day.

On that note, I must also apologize. I used three stamp sets to make these projects - two of them are retired. But they are so perfect for the occasion that I just can't part with them.  The "A Grand Kid" is still current and full of awesome sentiments so you can always get that one.

What crafting are you getting up to?  Or are you enjoying your own graduation ceremonies? If you are - congratulations! Huge achievement and one you should be proud of.

Have a great weekend everyone!
T


I think it's called a double step card.

So here's the thing, I did try to google and find out what this fun fold was called. Do you know what happens when a crafter googles car...